1. Creating One Virtual Machine Node
We first show how to create a single Ubuntu VM, which will become the base node for creating other nodes in the future. While installing the first node, we don't have to consider network related issues. We defer them to the section where we discuss how to connect multiple nodes as a cluster.
1.1. Downloading and Installing VirtualBox
There are two terms we will use very often in this chapter, host system (or simply host) and guest system (or simply guest). The host system is the operating system comes with your personal computer. Throughout this chapter, the host we refer to is Mac OS X. A guest system is the operating system installed on a VM. This this chapter, a guest is referred to Ubuntu Linux.
Oracle VM VirtualBox is a free and open-source hypervisordefine_hypervisor for x86 computers from Oracle Corporation. Developed initially by Innotek GmbH, it was acquired by Sun Microsystems in 2008 which was in turn acquired by Oracle in 2010. This piece of software is needed for creating and managing our VMs. One can obtain a copy of the latest distribution from its download pagevbox_download_page.
define_hypervisor. A hypervisor or virtual machine monitor (VMM) is a piece of computer software, firmware or hardware that creates and runs virtual machines. ↩
vbox_download_page. https://www.virtualbox.org/wiki/Downloads ↩
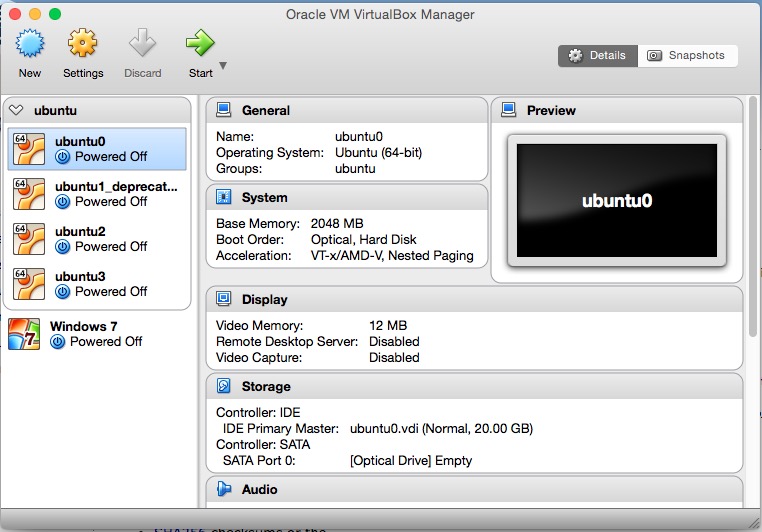
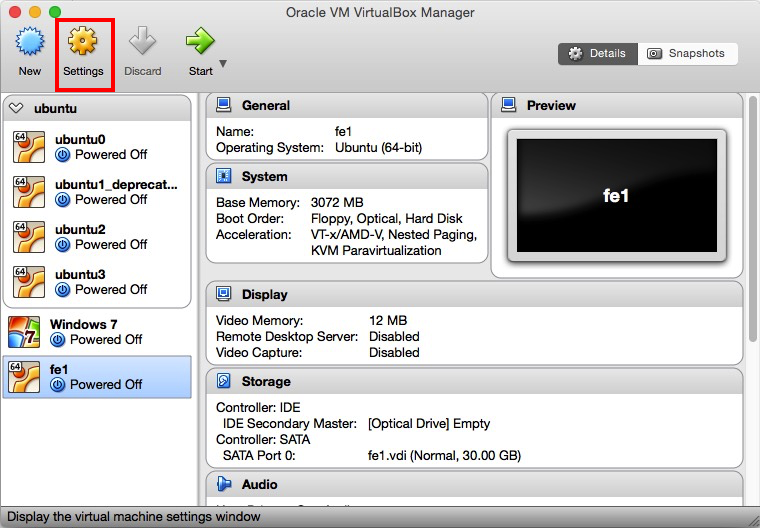
The following screenshot shows the interface of Virtual Box Manager version 5.0.16.
1.2. Creating a Virtual Machine
After Virtual Box being downloaded, we can use it to create our first VM. The detaled steps are listed as follows.
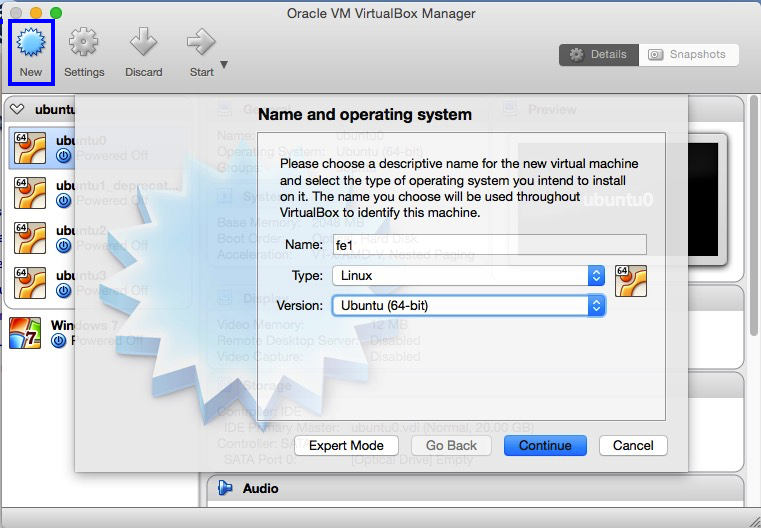
Step 1 Click New in the tool bar of Virtual Box Manager GUI. In the pop-up window, give a name to the VM you are creating. Since this is our first node which will be used as a front-end of our future cluster, we name it "fe1". Then choose the type of the Type as "Linux" and "Version" as "Ubuntu (64-bit)". This is shown in the following figure.
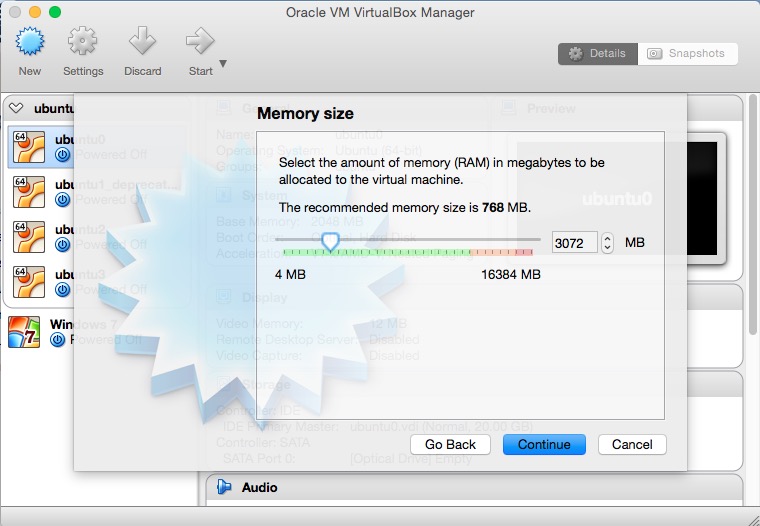
Step 2 Click Continue. This brings us to the window where we set the memory size for our VM. Since the memory on my host is 16G, I decided to give the first node 3 GB (i.e. 3072 MB). This size depends on your computer's configureation. The following figure shows my setting.
Step 3 Click Continue. Select the radio button Create a virtual hard disk nowother_options_vdi.
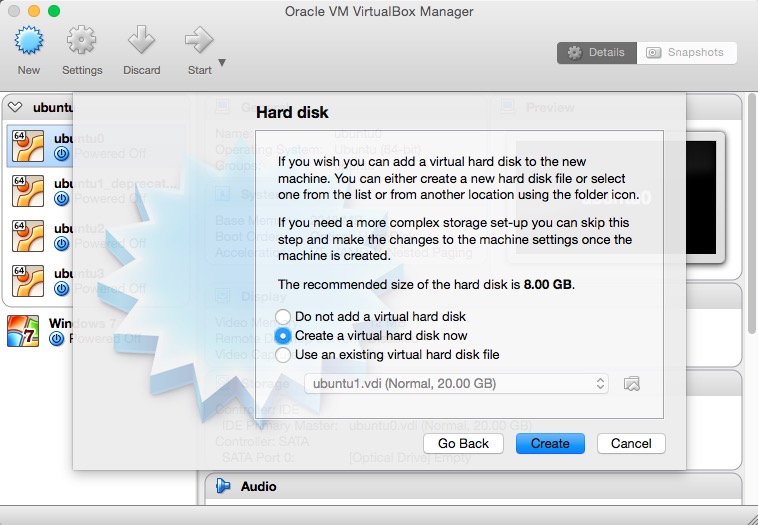
other_options_vdi. Alternatively, you can use an existing virtual hard disk (usually a .vdi file) if you have one. Since this is our first time to create a VM, we don't have an existing virtual hard disk. The relationship between a VM and a virtual hard disk is that the VM can be considered as a computer case and the virtual hard disk as the storage. ↩
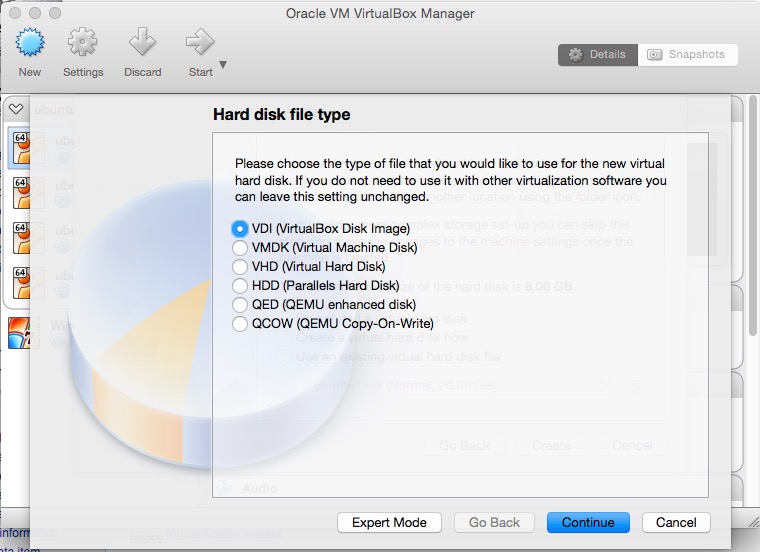
Step 4 Click Create. The next window allows you to choose the file format for your virtual hard disk. We choose VDI (VirtualBox Disk Image). ... TODO: What are other foramts for? ...
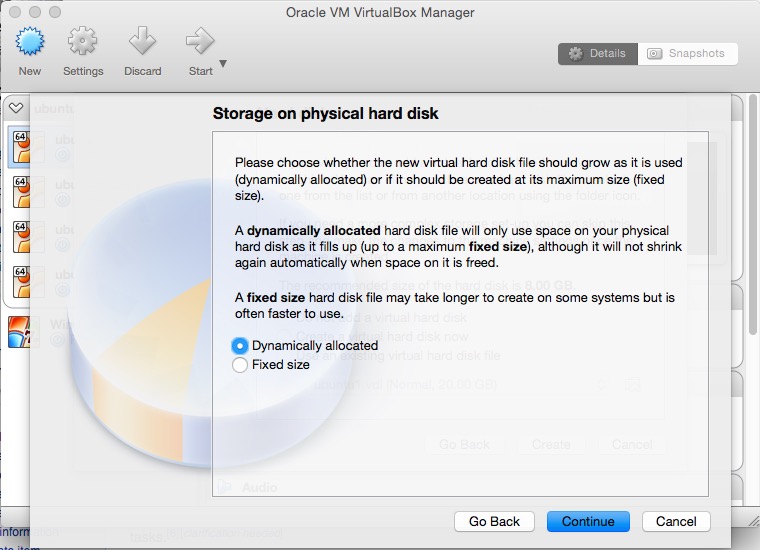
Step 5 Click Continue. The next window asks you to choose the type of storage of VM on physical hard disk (i.e. Macbook Pro). Here, we choose Dynamically allocated. The description is quite clear.
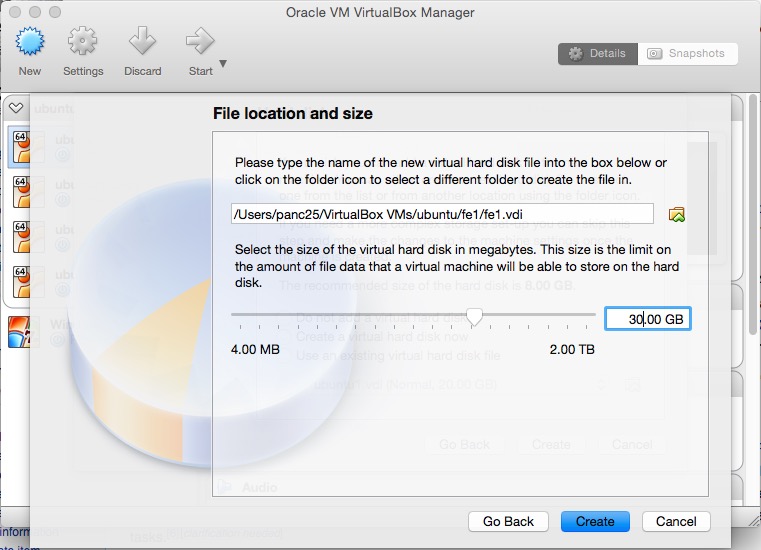
Step 6 Click Continue. In the next window, we need to decide the location where the virtual hard disk file (.vdi format) is stored and the size of the hard disk for the VM. If you use the default setting, the file will be created in Virtual Box installation location/system version/vm name/. In this demonstration, the Virtual Box installation location is in our home account $HOME/VirtualBox VMs where HOME is an environment variable. The system version is ubuntu and our VM name is fe1. So the default path for the virtual hard disk file is $HOME/VirtualBox VMs/ubuntu/fe1/fe1.vdi. The hard disk size is like the HDD or SSD on a physical computer. Here we set it as 30 GBextend_vm_hard_disk.
extend_vm_hard_disk. In case the VM's hard disk is full, we can extend its size and the file system of Linux. More details are deferred to later sections. ↩
Step 7 Click Create.
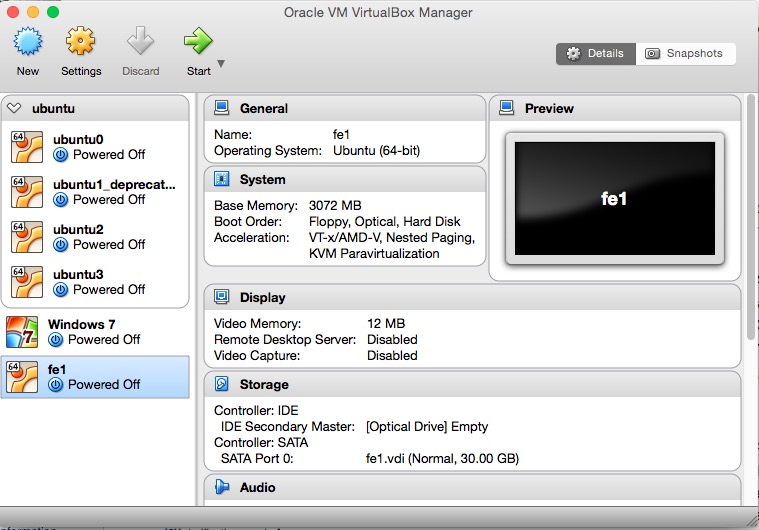
After the seven steps above, our first VM is created in Virtual Box with the virtual hard disk file created. This is like we have assemabled a physical computer. The next step for building a full-fledged computer node is to install the operating system.
Note When you first create a virtual machine, VirtualBox by default enables one virtual network card and selects the "Network Address Translation" (NAT) mode for it. (TODO: copied from VirtuBox manual) By using NAT, the guest VM is getting a private IP address (10.x.x.x). When NAT networking is enabled for a guest VM, VirtualBox automatically performs network address translation between the guest VM and host's network stack, so that you do not have to configure anything on the host machine and local network for the guest VM's networking to work.The implication of such NAT, however, is that the guest VM is not reachable or visible from external networks as well as from the local host itself. This is a problem if you want to access the guest VM from the host machine for some reason (e.g., SSH). If you want to access a NAT guest from the host on VirtualBox, you can enable port forwarding for VirtualBox NAT, either from the GUI or from the command line. TODO: copied from a downloaded article, need rewriting. The demonstration will be provided in a later section.
1.3. Installing the Operating System
1.3.1. Downloading Ubuntu Installation Disk Image
At the time of writing this book, the long term supper (LTS)explain_LTS version of Ubuntu server is 14.04.4download_link. Though the latest version is 15.10 is available, we choose to use a more stable version. We choose the server distribution instead of the desktop distribution is because we want to keep the system light-weight. Since the memory and disk storage is limited on a personal computer, we want to keep the operating system as minimal as possible.
explain_LTS. More details about LTS can be found at https://wiki.ubuntu.com/LTS. ↩
download_link. Ubuntu 14.04.4 ISO can be downloaded from the server page http://www.ubuntu.com/download/server ↩
After Ubuntu 14.04.4 ISO being downloaded, we can install it in the VM we just created. The installation process is similar to installing Ubuntu on a physical computer.
1.3.2. Configure Boot Device and Order
Since our VM is not empty, it cannot be booted from a normal hard drive. Instead, we need to configure the VM to boot from the ISO file we just downloaded. In order to accomplish this, first select the VM "fe1" we just created and click Settings in the Virtual Box Manager GUI.
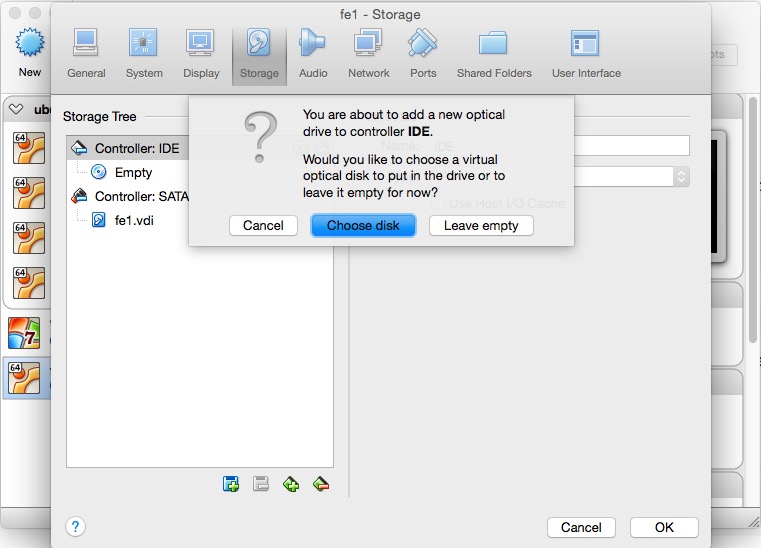
Then, under the Storage tab, click the disk icon with a plus sign (TODO: replace with an inline image) next to Controller: IDE.

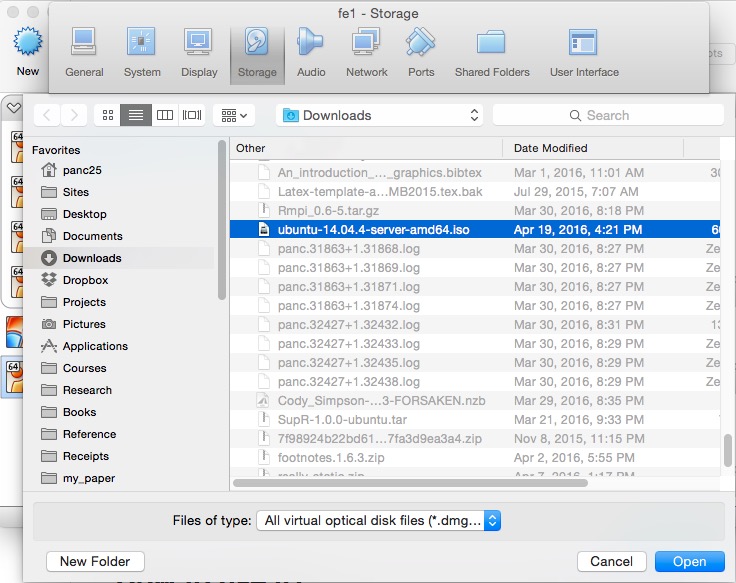
Next, in the pop-up dialogue window, click Choose disk, then choose the ubuntu iso file we just downloaded and click Open.
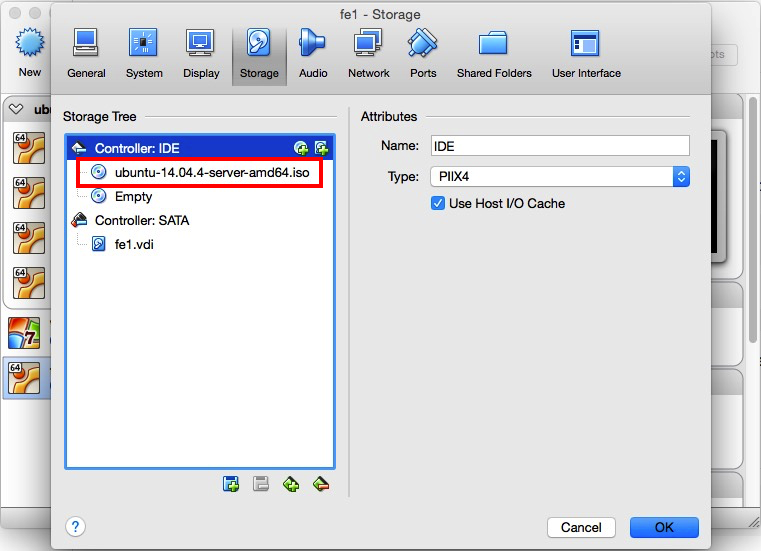
Now, you can see from the Storage window that ubuntu_14.04.4-server-amd64.iso is listed as a new IDE device.
After adding the ISO file as a new IDE device, we also need to tell VM to boot from this device.
Go back to Setting, and select the System tab.
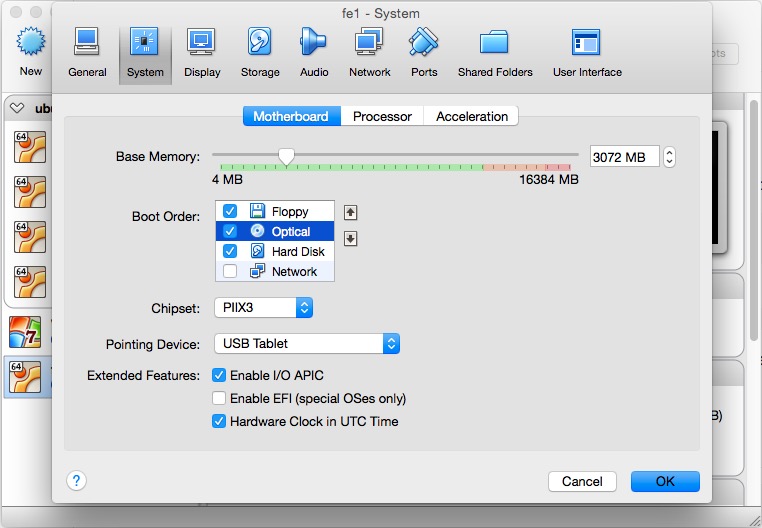
In the pop-up window, Optical device is listed as the second boot device, we need to move it to the top by clicking the up arrow TODO: replace with inline image. Then, click Ok.

1.3.3. Installing Ubuntu Server
We have created an empty VM, downloaded the OS image file, and configured the boot order. Now, we are ready to install the OS. The installation of the OS is similar to the the installation on a physical computer. The following describes the detailed steps.
Step 1 Start "fe1" VM in the VM Manager by double clicking its icon. A new window will show up which is your "computer monitor". Alternatively, you can start the installation window via right click "fe1" -> Start -> Normal Start. In the window, choose your desired language for your installation (we choose English).
Step 2 Choose Install Ubuntu Server.
Step 3 Choose the language (English) again and your location (Normally the country you live. This is used for your time zone. So we choose China). combination of China and English not recognized.
Step 4 Configure the keyboard. Choose Detect keyboard layout.
Step 5 Configure the network. Give your node a hostname. It is used to refer to this node by this name later on without using its IP address. We use "ubuntu-fe1". You can use any name your want.
Note The hostname of your laptop is "localhost" and its IP address is 127.0.0.1.
Note By specifying the hostname, Ubuntu will write the information to the file /ect/hostname.
Step 6 Set up user and passwords. While root account is available in a Linux OS, it is highly recommended to create your own account for non-administrative activities. In this step, provide your real name (Pan Chao), your account username (panc), and password (passward). The installation process also gives you the option to encrypt your home directory. Since this section is for demonstration purpose, we choose No.
Note It will take some time to configure the time for the system.
Step 7 Configure disk partitioning. It configures the native Linux file system on the available disk space (30GB). We choose Guided - use entire disk and set up LVM. Follow the instruction to configure your file system. This may take a while.
Note LVM stands for Logical Volume Management. It is a system of managing logical volumes, or filesystems, that is much more advanced and flexible than the traditional method of partitioning a disk into one or more segments and formatting that partition with a filesystem. More details can be found on Ubuntu's wiki page.
Note In case your disk is not large enough, we can allocate more disk space to a VM and expand the file system. Useing LVM has the implication on how we expand the file system. A detailed discussion will be deferred to a later section.
Note Skip configuring HTTP proxy since we are not using any.
Step 8 Configure tasksel. We choose No automatic updates. We will manually updates softwares.
Step 9 Select pre-installed softwares. By default, only the core of the OS is installed. We choose to install OpenSSH server and LAMP server. In order to make the selection, use up and down arrows for navigation and hit Space to select.
Note LAMP is a software bundle consisting of Linux OS, Apache HTTP Server, MySQL relational database management system (RDBMS), and the PHP programming language.
Note During the installation of MySQL, you will be asked to assign a root password. We simly use "root" as the password.
Step 10 Install GRUB boot loader. Briefly, a boot loader is the first software program that runs when a computer starts. It is responsible for loading and transferring control to the operating system kernel software (such as the Hurd or Linux). The kernel, in turn, initializes the rest of the operating system (e.g. GNU)(copied from GNU GRUB). More details can be found on GNU GRUB's page.
Step 11 Finish the installation and reboot. At the login prompt, type your username and password we just specified in Step 6.
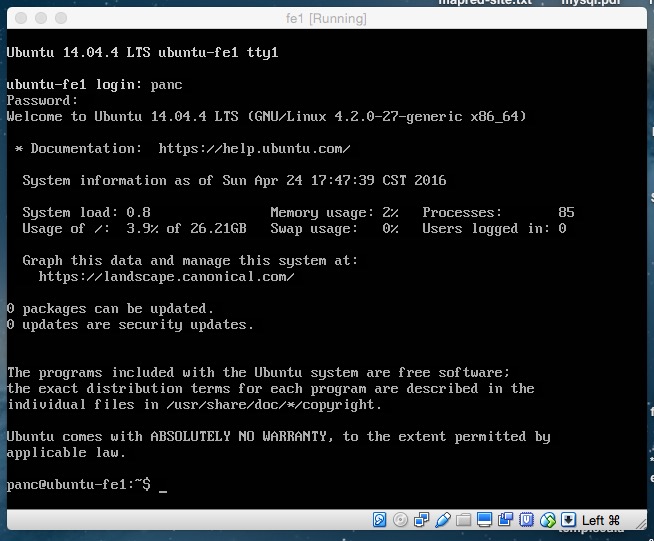
Now we have installed our first VM which is used as the front end in our VM cluster.
1.3.4. SSH VM from Host
Though our VM is fully functional which can be accessed via its VM Manager terminal, the font is kinda ugly (TODO: or use primitive?) and it lacks the ability of copying and pasting. The terminal software on our host system (e.g. Terminal on OS X) provides a better appearance and more functionality. It would be desirable to be able to ssh to and operate on the guest system from within the host's terminal. In order to enable this feature, we have to configure VirtualBox properly.
Configuration through VirtualBox VM Manager's GUI
Since the guest ues NAT networking, this can be accomplished by enabling port forwarding for VirtualBox NAT, either from the GUI or from the command line. This section provides the detailed steps for configuring port forwarding from the GUI.
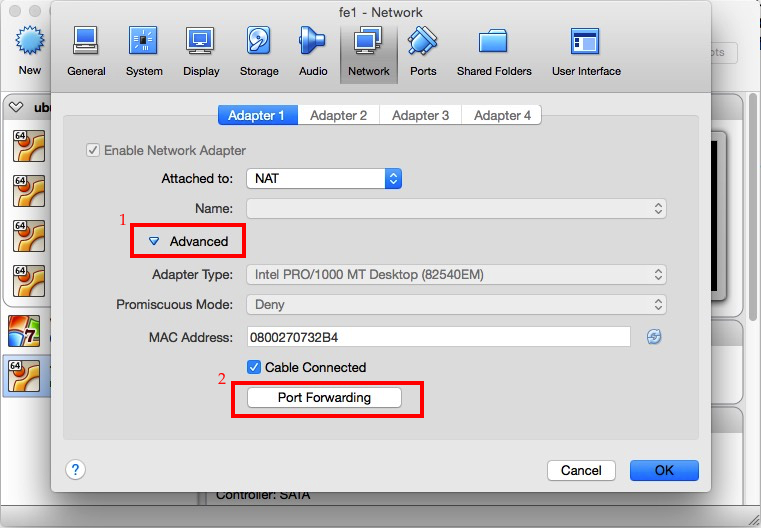
Step 1 In VM Manager, choose the VM "fe1", and open Setting window of the VM. Click on the Network tab on the top, click on "Advanced" to expand the additional network adapter options.
Step 2 Click on a button labeled Port Forwarding. You will see a window where you can configure port forwarding rules.
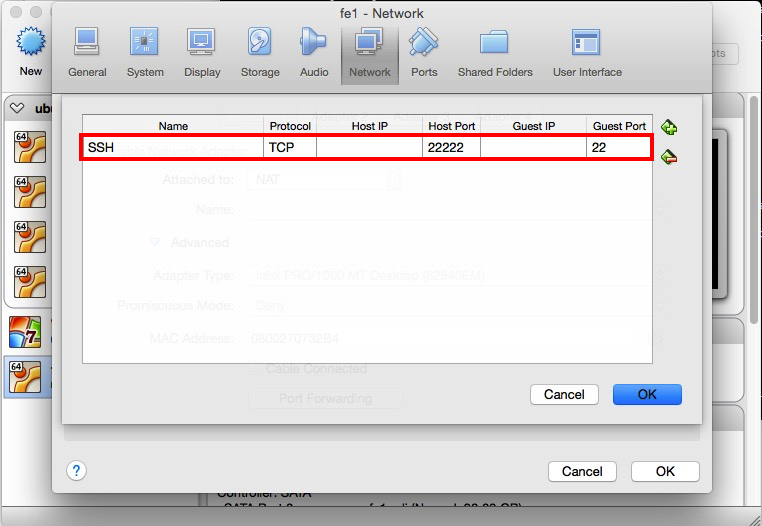
Step 3 Click on Add icon in the upper right corner. Add a new port forwarding rule with the following detail.
- Name: SSH
- Protocol: TCP
- Host IP: (optional) 127.0.0.1
- Host Port: 22222 (any unused port number higher than 1024) TODO: I tried 2222, but "Host key verification failed".
- Guest IP: (optional) IP address of the guest VM
- Guest Port: 22

Configuration through VirtualBox's commandline interface
VirtualBox provides a commandline tool, called VBoxManage, to enable operation on VM Manager in a terminal shell. In order to use it for VM port forwarding, use the following command:
VBoxManage modifyvm "fe1" --natpf1 "SSH,tcp,,22222,,22"
Log in guest from host
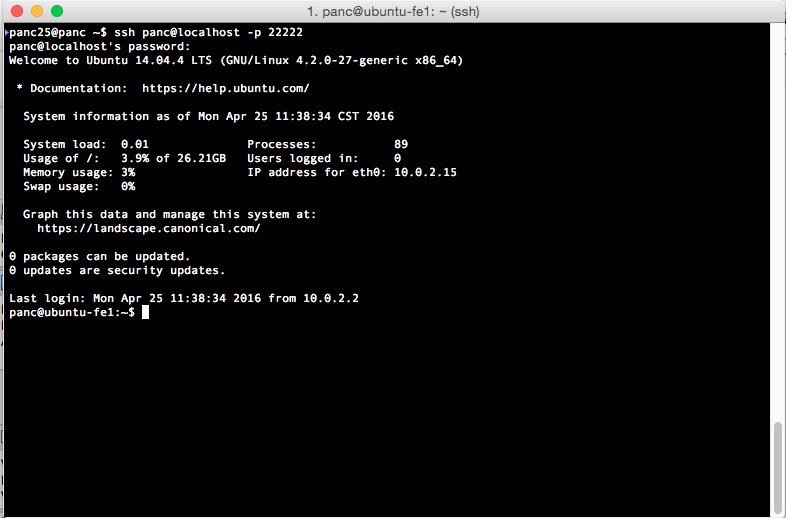
After the above configurations, you can now ssh to the guest OS by typing the following command in your host's terminal shell:
ssh panc@localhost -p 22222
where panc is the username of the account for Ubuntu and the option -p 22222 passes the forwarded port number as an argument.
The authenticity of host '[localhost]:22222 ([127.0.0.1]:22222)' can't be established.
RSA key fingerprint is 6c:02:8e:e6:c9:7f:91:0f:f6:07:9d:13:00:83:f9:ce.
Are you sure you want to continue connecting (yes/no)?
Simply type yes to confirm that you want to proceed and then type the password for your Ubuntu account, i.e. password. Now, you are in the Ubuntu VM "fe1".
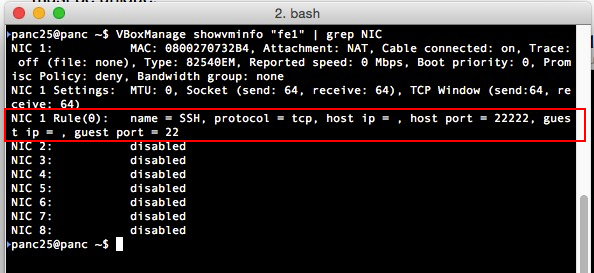
Once the port forwarding rule is created, you can verify that by using the following command:
VBoxManage showvminfo "fe1" | grep NIC
Now you can preform all kinds of operation on Ubuntu from within your host's terminal shell, which is nativly integrated with your host system.
Simplify your life with an SSH config file
Using the above command requires remembering the username, hostname and port number. If you have to log in and out of many servers in your daily work and you have poor memory like me, it would be very painful.
One solution is to cut down the verbosity by creating a simpler alias for each command. For example, edit your $HOME/.bash_profile file (TODO: What is the difference between .bash_profile and .bashrc?) by appending the following line:
alias ssh-fe1='ssh panc@localhost -p 22222'
Then you can log in the guest (after source($HOME/.bash_profile)) by simply typing ssh-fe1. This works just fine.
Alternatively, there is a much more elegant and fexiable solution to this problem. This is done by eiditing your $HOME/.ssh/config file. If you cannot config file in the $HOME/.ssh/ directory, just create one. Enter the config file the following:
Host ubuntu-fe1
  HostName localhost
  Port 22222
  User panc
Now, we can simply run ssh ubuntu-fe1, and the options will be read automatically from the configuration file.
Passwordless login
Though using an alias or an ssh configuration file alleviate the burden of rememnber the usernames, hostnames and various options, each time we still need to type the password. A more important motivation for enabling passwordless login is that most distributed computing systems use ssh for network communication. So a passwordless setup is required.
Password login is set through creating and configuring public/private keypairspublic_and_private_keys_refother_auth_method. One can use different keypairs for different servers to ensure that in the event of having one of the keys compromised the damage is as restricted as possible. Nevertheless, we use one public/private keypair for all servers in this chapter in order to minimize our workload.
public_and_private_keys_ref. A good reference on public and private keys can be found at: https://www.comodo.com/resources/small-business/digital-certificates2.php?s_track=7639&key5sk1=6346caf8b13ba3b6c83f339651110c114ce37e8a. ↩
other_auth_method. Another popular authentication method used by many cloud computing service is via authentication tokens. ↩
The first step to enable passworkless login is to generate a public/private keypair on the host. Runing the following command on our host (i.e. Mac OS).
ssh-keygen -t rsa
Immediately, you will be asked for the location to save the to-be-generated key files. We create a new directory via mkdir $HOME/.ssh/demo and rename the files to demo_id_rsa (TODO: What is the difference between rsa and dsa?). It will also ask you for a passphrase to protect the key files. It is up to you whether you want to use a passphrase. In the current demonstration, we choose not to use a passphrase (just press Enter twice). This following is the entire key generation process:
Generating public/private rsa key pair.
Enter file in which to save the key (/Users/panc25/.ssh/id_rsa):/User/panc25/.ssh/demo/demo_id_rsa
Enter passphrase (empty for no passphrase):
Enter same passphrase again:
Your identification has been saved in /Users/panc25/.ssh/demo_id_rsa.
Your public key has been saved in /Users/panc25/.ssh/demo_id_rsa.pub.
The key fingerprint is:
87:7e:6c:64:6a:ba:41:ab:35:4c:b0:f3:b0:ff:d7:f4 [email protected]
The key's randomart image is:
+--[ RSA 2048]----+
|                 |
|                 |
|    .            |
|     o   .       |
|    + o S +      |
|     O o *  .    |
|    . B + +o .   |
|     + = o. . E  |
|    . +o..       |
+-----------------+
The public key is now located in $HOME/.ssh/demo/demo_id_rsa.pub and the private key is saved in the file $HOME/.ssh/demo/demo_id_rsa. Make sure you set the permission of your private key file properly to be only accessible by yourself, that is running sudo chmod 600 $HOME/.ssh/demo/demo_id_rsa if the permission is not 600 yet.
Once the key pair is generated, it is time to place the public key on the VM we want to use. You can copy the content of demo_id_rsa.pub with the ssh-copy-id commandinstall_ssh-copy-id_on_mac.
ssh-copy-id -i $HOME/.ssh/demo/demo_id_rsa.pub -p 22222 panc@localhost
The following shows the copying process, where we need to provide the password of the account on the VM.
/usr/local/bin/ssh-copy-id: INFO: Source of key(s) to be installed: "/Users/panc25/.ssh/demo/demo_id_rsa.pub"
/usr/local/bin/ssh-copy-id: INFO: attempting to log in with the new key(s), to filter out any that are already installed
/usr/local/bin/ssh-copy-id: INFO: 1 key(s) remain to be installed -- if you are prompted now it is to install the new keys
panc@localhost's password:

Number of key(s) added:        1

Now try logging into the machine, with:   "ssh -p '22222' 'panc@localhost'"
and check to make sure that only the key(s) you wanted were added.
install_ssh-copy-id_on_mac. On Mac OS, you can installssh-copy-idvia brew asbrew install ssh-copy-id. ↩
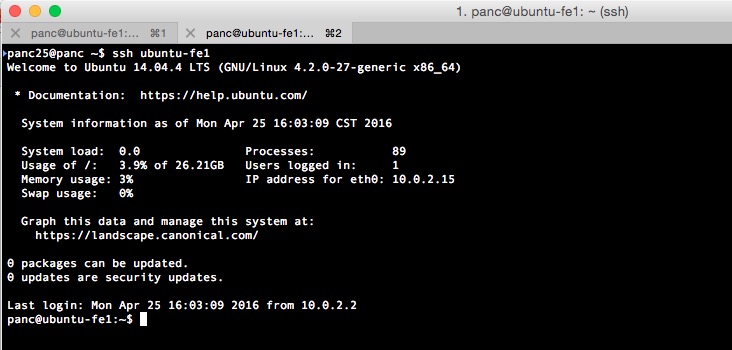
You also need to specify the private key in your $HOME/.ssh/config file if it is used for configuring your ssh. Update the file by adding the following line under Host ubuntu-fe1:
IdentityFile ~/.ssh/demo/demo_id_rsa
If you properly edited $HOME/.ssh/config and configured public/private keys, you can now log in "fe1" VM by simply typeing ssh ubuntu-fe1. The following shows that result:
1.3.5. Enabling Internet Access from Guest
1.3.6. Installing Additional Softwares
Enabling main repository for 14.04
# enable Main & Universe repository
sudo add-apt-repository "deb http://archive.ubuntu.com/ubuntu $(lsb_release -sc) main universe"
sudo apt-get update
Java
Java is commonly used as the compiler and the run time environment for many (almost all?) big data systems including Hadoop and Spark and their applications. At the time of writing, Java 8 is released (TODO: How about their support for Java 8?).
There are multiple versions of Java available for Ubuntu Linux, including OpenJDK and Oracle JDK (TODO: other JDK version on Ubuntu?). In this section, we choose to install OpenJDK 8 by running the following commandfail_to_install_openjdk8:
sudo apt-get install openjdk-8-jdk
fail_to_install_openjdk8. If you enounter "Unable to locate package openjdk-8-jdk" error, please refer to the appendix for a workaround. ↩
Emacs